Saturday, May 28, 2011

Waterlogged !

After the sunny long weekend we just had, it has rained almost constantly since Tuesday, and we're not expected to see sun again before Tuesday. We are in no danger of flooding and have had none of the extreme weather our southern neighbours have been subjected to. My prayers go out to all of you dealing with the ravages of the flooding and the tornadoes that have been plaguing different communities recently.

Our rain is only inconvenient and so we are very lucky.

The upside to the rain is that - everything moved aroung and divided in the garden last week has been well-watered in and seems to have recovered nicely from any trauma. They all look good and the rose bush is showing a lot more leaves this morning.

The other upside is - although I will spend this weekend indoors, it will be mostly spent sewing and baking. Laundry is the only other 'must-do'.

The last pant-fit coming up shortly...


Monday, May 23, 2011

Gardening

*** 'lizabeth - now I know you're lurking - you're safe with this one - no butt pictures LOL ***

I didn't get back to the sewing room today. Went to the market to stock up on yard supplies / laundry (3 great days for line drying) / baking (oatmeal cookies and peanut butter cookies) / worked on 2 of the flower beds.

We've got 6 beds that need work in a bad way - I didn't do anything last year and they're overrun with grass and weeds. Today was the day to start.

All stocked up and ready to go...

I started on the bed that needed the least work-a quick fix I thought, NOT...

4 hours later...I'm pretty sure this is the first time that this bed has ever been mulched - will help with the weeding for sure :-)

In the meantime, hubby was working on the iris bed. This is 16 feet long by about 18 inches deep. I'd love to make it 2 feet deep or more but that's going to mean digging out a LOT of rocks ! This bed has yellow and purple irises, perennial geraniums and lots of grass. We have to dig it all up, clean out the weeds and divide what we're keeping, replace the edging and dig in some fertilizer and earth before replanting everything.

It started out like this...


...and after a lot of digging, it's about half done...the irises on the right are the ones I divided and will replant. Everything else is coming out (there are 3 geraniums in the bed I worked on - temporarily til they go back in with the irises)

Hubby found this hidden in the irises - our neighbour gave us a couple of raspberry stalks 3 YEARS AGO and they've been living neglected in this pot with a couple handfuls of dirt ever since. I figure anything that can survive that ought to be planted, no ? LOL

I decided to give veggies a go again this year. I picked up a yellow pepper/basil/regular tomato/cherry tomato
...have to clean out their bed before I can plant them though.


Still so much to do.

Back to work tomorrow for me.
Hope you all had a great weekend.


Sunday, May 22, 2011

HP Plain and Simple - another tweak

My goodness - thanks everyone !

Kay - if I understood you correctly, then I've just done it...I knocked off the point of the front crotch curve and made it a curve about 1/2 of what it was at what was the corner point.


Now, the one thing I HAVEN'T done yet is to clip out all of the extra fabric at the crotch curve. I was paranoid about cutting it out then finding I needed it later. I've just had a brainwave and enlisted hubby's eyes and camera. He took another set of pics after I rounded the point of the crotch curve. There is a fold of fabric on the inseam of my left leg both front and back. I don't want to have to make separate adjustments for each leg so figure I'm stuck with some wrinkles. THEN I remembered I hadn't cut out the excess curve fabric. I put the pants back on and folded all that seam allowance to the OTHER side of where it had been and the folds CHANGED sides !

So, now I'm off to bite the bullet and cut out some of that crotch SA.


HP - Plain and Simple Pants - 1st round of adjustments

I've been playing with this most of today. I'd decided to trace out the size 10 lines from just above the hip line. My hope was that this would give me a fit closer to 'me', keep all those nice straight lines intact and take in some of the crotch bagginess. It kind of worked.

Mary Beth so kindly pointed out that I might do well with an L-shaped front curve. I decided to cut the size 10 lines 'as is' and see what's what. Well, what's what wasn't good ! No evidence LOL

I scooped the front crotch into an L-shape and tried 'em on - a bit better but still saggy/baggy. Pinched out another wad and sewed another 'L'.

For the back, I dropped the CB seam down 1-inch and carried the 'L' over to the crotch point.
The good - I'm very happy with the (non)shaping over the hips (I'm just not really curvy LOL), very happy with the straight lines still being straight, very happy that the back wrinkles are less (just look at my right butt !!!).

The bad and the ugly all in one - There are still poochy folds both front and back although less.


I'm thinking now that I should shorten the crotch extensions - I can't think of any other way of getting rid of those folds.

More basting coming up...


Saturday, May 21, 2011

HP - Plain (yes) & Simple (not so much)

Well, they fit at the waist and over the top of the bum but unless I'm misreading the problems, they're just overall too big.

The good - all the lines are straight, the knee line is AT my knee, that L-crotch does seem to be shaped like me.
The bad - too big, lots of folds - both front and back, you can't actually see the L-curve doing its thing because of the folds at the inseam.
The ugly - the front crotch - oooh boy !

My measurements put me in a size 14. After measuring the pattern pieces, I cut a 12. I almost cut the 10 but it required more confidence than I had :-). The vertical grainlines are thread traced, as well as the knee line - I forgot to trace the hip line. Both the zip and the waistband are basted on.

DH took distance and close up shots of all 4 sides. The front view is pretty gross. LOL. The back has lots of wrinkles, but they look different from the last pattern I was working with. They're all more vertical or diagonal rather than the horizontal bunching from before. At issue is the amount of fabric at the crotch - it's like wearing a diaper. Both front and back have too much fabric. Like about an extra inch, maybe more, of folds. Side seams from waist to hip are poochy. My hip is much flatter than most patterns, I think.

I've checked out my fitting books and online to see what do do about the extra folds but didn't find anything. Going on the basis of 'just too big', I think I'm going to recut them smaller - the size 10 may take out enough of the fullness to get a better picture.

So, without further ado...the first muslin.


As usual, I'm open to any suggestions.

Friday, May 20, 2011

Slow and Methodical

No basting yet - I figured if I'm going to make adjustments, I'd better set the stage.

Last night I transferred all the markings and thread traced the kneeline and the grainline. The grain was marked about 3 inches from the inseam. I folded the legs in half and threadtraced the grain at that point.

It's not going to be a quick and dirty muslin - marking and tracing took ages !

More progress tonight...maybe even pics...stay tuned...


Wednesday, May 18, 2011

Next step in the Pant journey

Monday I took out my HP pants patterns and measured the patterns - Weekender Chinos and Razor Sharps - WIDE pants - and by the looks of it drafted VERY large - I expect to have to cut about a 12 or 14 but my measurements fit somewhere in the size 8 range - WoW ! (hmm, should probably clarify that – based on the measurement chart, I fit into the 12-14 range – it’s just that the pattern runs large enough that after flat measuring the pattern pieces their size 8 is about where I fit – I’m not a legitimate size 8 but maybe one day LOL)

The Plain and Simple Everyday pants seemed to be more in line with what I'm shooting for - the width at the hem is only about 2-inches larger than my adjusted Burda pattern. I decided to start with this one. No adjustments. None. Really. No changing my mind partway through the basting. Definitely. Well, I did add 1-inch to the leg length, but that's it.


It's all cut out. Tomorrow I'll baste it all together and see where I stand.


Sunday, May 15, 2011

04-2009-119 - a bit improved

*** a quick update after wearing them all day today (in normal shoes and socks !) Fabulously comfy ! ***

Had the day to myself and used it to finish the waistband, button, buttonhole and hems of the latest pants.


Text below is taken directly from my PR review - link to the real thing is on the sidebar.

Pattern Description: Trousers with curved four-piece waistband that are fitted at the waist and hips and gently flare to the hem.
I made this up 'as is' once and have since used it as a jumping off point for a narrower leg pant - possibly not my best decision.

Pattern Sizing: 34-46 - Originally, I cut a 44 waist blending to a 42 at the hip but as this is my 3rd tweak of the pattern, I have no idea what number it's at now for size. I do know it's smaller though !

Did it look like the photo/drawing on the pattern envelope once you were done sewing with it? Nope

Were the instructions easy to follow? Burda ? Instructions ? Easy ?! I used Readers Digest, Singer's Pants that Fit, Sandra Betzina's fly tutorial as well as help from PR, specifically Sew4Fun's shifted leg recommendation and how-to.

What did you particularly like or dislike about the pattern? It's a great basic pant - if I could only get a handle on those wrinkles !

Fabric Used: Same as last time - I found 10yds of a lovely, cushy bottomweight to use for pants practice. I want to say RPL but it could be just poly. It wears VERY well throughout the day.

Pattern alterations or any design changes you made:
Here we go...as I said, this is my 3rd go at this pattern. My adjustments to date include:
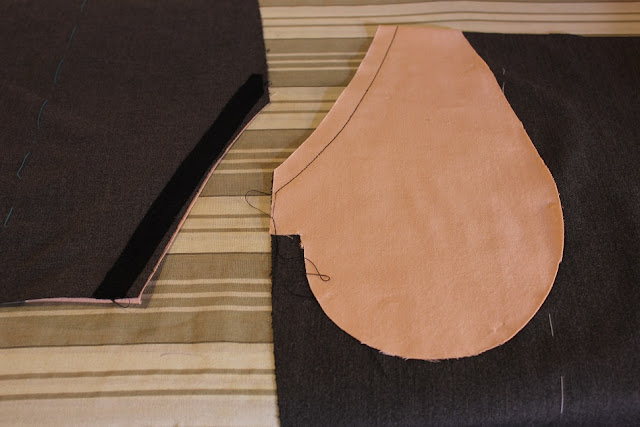
Design changes:
- added pockets - I used the pockets from Butterick 6420. This was my first attempt at franken-patterning and had a bit of a problem. One of the pieces was measured too small and I had to redo it. I'm pretty happy with them now. I did not cut a pocket stay and was a bit worried about gaping, but once the waistband went on, they don't gape hardly at all.

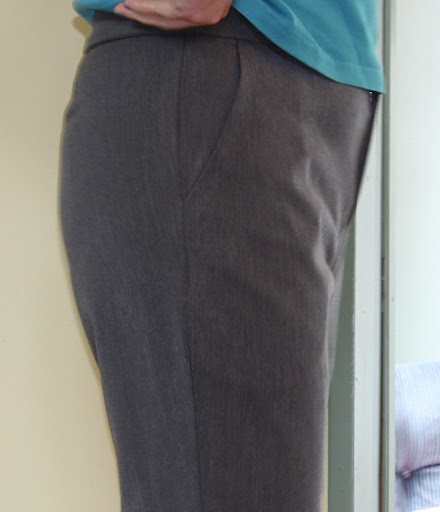
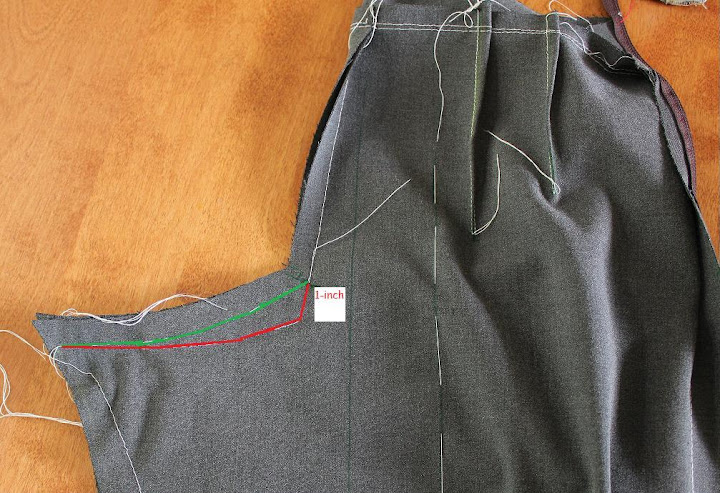
- narrowed legs by marking 1-1/4 inch on each side of the leg at the hem and blending up to 1/4 inch at 2 inches below crotch line.

Alterations:
- took in the the back darts to a 3/4 inch depth (but left them the original length)

- took in 1/4 inch on each side seam from waist blending down over the hip and flattened that curve a bit.

- lowered center back waist by 1/2 inch

- scooped crotch approx 1/4 inch

- sewed a 3/8 inch deeper seam on the straight part of the CB seam

- on the back inseam I shortened the crotch extension almost 3/4 inch

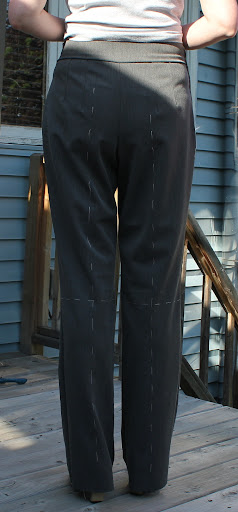
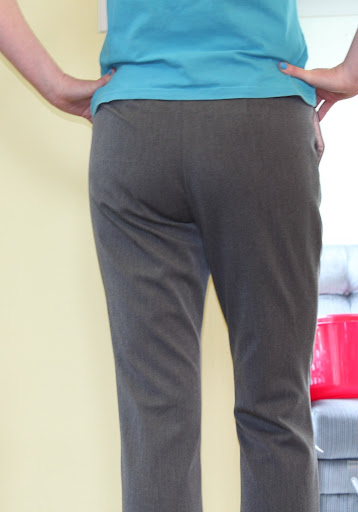
- to remove some of the under-butt wrinkles I removed a wedge from the back leg under the crotch - 1/2 inch

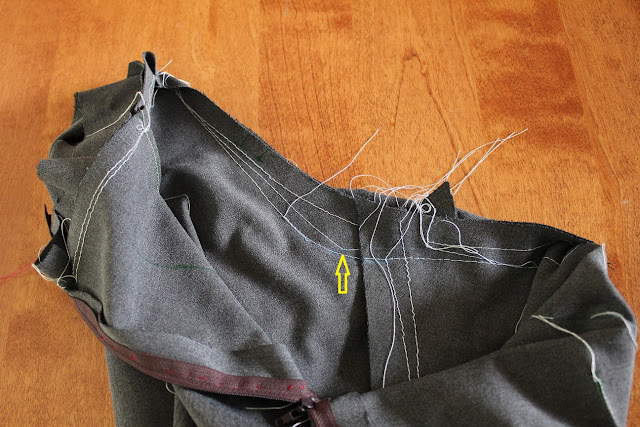
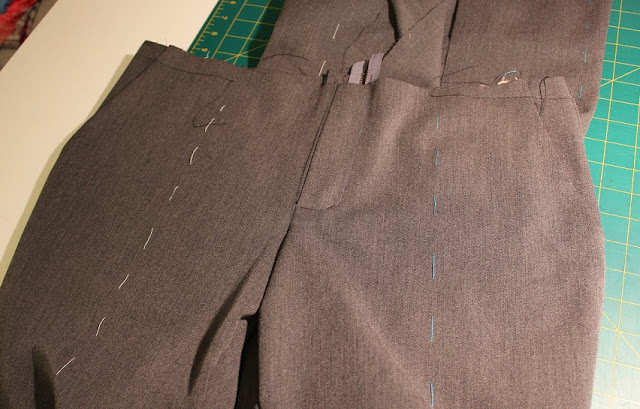
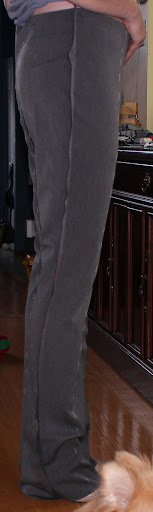
After posting for help both here and on the Fitting Woes board on PR (and receiving soooo much feedback), I decided to try Sew4Fun's suggestion of shifting the leg. I cut the back leg in two just under the crotch and shifted the leg towards the inseam. After the fact, I realized I should have shifted the leg at the KNEE not the crotch, but the muslin showed the wrinkles were noticeably less - Wow !

However, I saw the grainlines were really distorted.

During sewing up the pants, those crooked grainlines were really bugging me - the inseams were so far forward and the side seams so far to the back.

With 3/4 inch SAs to play with, I sewed the fronts to the backs with 3/4 SAs for the back pieces and 1/4inch SAs (yes, it's too tiny, but I did it anyway) for the front pieces. This helped recenter the grainlines and place the seams centered to my leg, but in the final pics, those wrinkles are back !


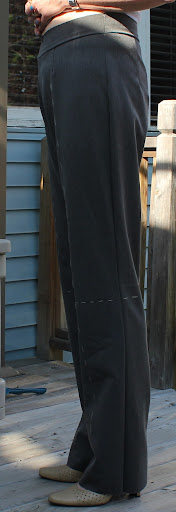
The muslin pic above does NOT have the waistband attached. That may be part of the problem and shifting the seam allowances may have had a detrimental effect - but I'm not sure. Should have left well enough alone and just made one change at a time.

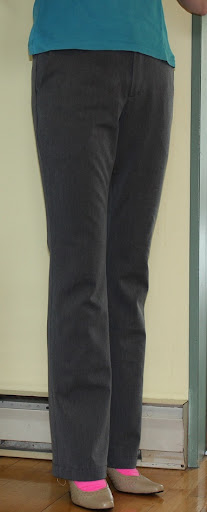
I DO like the front views and the back view is much better when I stand with one leg forward - we all know those wrinkles are worse when we're standing still LOL.

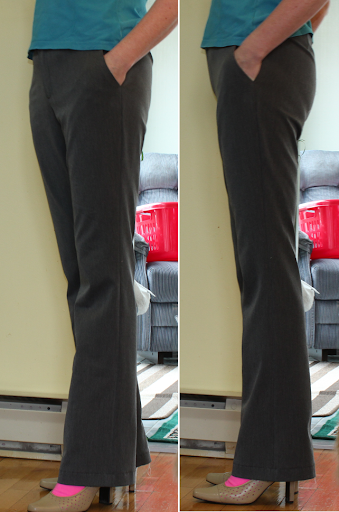
Please ignore the fashion disaster - I would not normally wear bright fuschia socks with heels !

Would you sew it again? Would you recommend it to others? I do recommend the original pattern, but probably won't make it again as I prefer a narrower leg.

Conclusion: They're not perfect, but they're better than the previous pair, no worse than my RTW pants, and are wearable. I'm still working on a TNT pants pattern but I've learned a lot so far with these.


Now, I think I'm going to put this pattern aside for a bit. HP patterns have had good things said about them in regards to the L-shaped crotch for a flat butt. I've got Razor Sharp, Weekender Chinos, Plain & Simple and the Jean Jeanius patterns all in my stash. Plain & Simple would probably be the most logical one to start with, but the Razor Sharps are drawing my eye :-)

Friday, May 13, 2011

It's official ... and too funny :-)

I went to physio today for a lifelong knee pain which was helped by surgery 16 yrs ago and is giving me grief again.

I got a full evaluation, therapy which consisted of torturing my butt and leg muscles and was sent home with a bunch of exercises to strenghten the weakling muscles. I'm hopeful that they will help.

John now knows I sew. Odd that it would come up in conversation ? Maybe, but during the evaluation the following words were uttered - by him :

swayback, hyper-extended calves and forward tilted pelvis/hip LOL !!!

ya think ?

My self diagnosis, made with helpful advice from all of you and the kind folks over at PR, has been officially and medically confirmed.

Of course I couldn't resist and informed him that I knew most of that (forward tilt suspected but not yet in the list of fitting adjustments) and it made fitting pants a nightmare prompting him to have to wrap his brain around "you SEW your pants !?"

He has no idea the pics I've posted here :-)

All in all - too funny LOL

Now, I just have to get that in-progress pair finished...stay tuned.


Sunday, May 8, 2011

Note(s) to self

1) When cutting out a pattern without seam allowances, make sure to add them everywhere they're supposed to be !

Yes, I'm still working on the pants - no, definitely not going to be finished today :-(

2) 2 legs, 4 attempts - RS together-'nuff said


Sunday, May 1, 2011

04-2009-119 - still working on 'em

I was hoping that this would be a 'completed project' post, but it was not to be. :-(

After 2 weeks, I finally got back to my pants. After getting so much great advice on the wrinkles, I decided go with the "shift the leg towards the inseam" suggested by
Sew4Fun and others. It did get rid of most of the wrinkles and looks a lot better EXCEPT the grainline is sloping towards the sideseam on the front and towards the inseam on the back. Rather than trash this pair, I'll take note for next time to shift both the front and back (below the knees) to see it that will fix up the grainline without affecting the butt wrinkles.

I only want to do one major change at a time, but will try the Low Butt Adjustment on one of the next pairs to see the difference.

Anyway, that muslin was done 2 weeks ago and taken apart ready for 'real' sewing - then work was busy and we were away for 4 days for Easter. Today, I was working on them for sure !

...however, not one to leave things alone, I decided to add pockets (do NOT like pants without 'em and I prefer a pocket for my pedometer rather than the clip on the waistband)

So, I started this morning with the pocket pieces from B6420.


I knew I didn't want to use this cushy fabric for the whole pocket so I went with cotton for the pocket bags with the grey pants fabric for that little side bit that shows.
I lost my last battle with fusible interfacing so I was very careful to not move anything til it all cooled - so far so good. The seam is stabilized - and stayed that way - bonus


Pockets all attached - looks fine, yes ? oh, wait it gets good.


Fly is in (really happy with the fly, Sandra Betzina's video is my go-to for these and it's getting easier), sideseams, inseam and crotch are all basted - still good , huh ? yup keep waiting - I so wish I'd posted my intentions this morning, you'd have all stopped me, I'm sure


Aha, here we go - the back part of the pocket bags with the pants fabric attached. I'm sure you all see the problem.


You know,right up til I figured out the problem, I was happy with these. I serged the edges of both the grey and the peach cotton and cut out the extra cotton from the back of the grey, so only one layer except where they join.


My duh moment - I had these all basted and put them on before I figured out just how 'too tiny' my grey side pieces are. The pockets gape some and it's horrible. Now the basting all comes out, the pockets come off and I'll replace the grey piece on each side with a larger one.


Finished pants to come - when? who knows?