Sunday, April 15, 2012

S2860 - clipped

What a difference clipping that crotch seam makes - I admit to being pretty surprised.

Back-

Front and Sides - specifically showing the wrinkles below the zipper. I looked through my books for these wrinkles and came up with a couple possibilities - thin thigh (add to front crotch point) and prominent abdomen (straighten center front seam) - sorry for some reason I can no longer get pics to size small enough to completely show, even though I pick 'small' for the size. Clicking, of course, does show the whole pic.

As you can see below, the front tugged up a tiny bit makes the wrinkles go away. I'm not sure which of the two possible adjustments to try, or is there something else to try.

Saturday, April 14, 2012

S2860 - to date, and what's next

I was going to sew up the pants 'as is' or at least 'as was' - at the state they were when I lowered the side seams on Monday.

Well, I've spent the last few days digging around the 'Net, PR and blogs for more research. On PR, in the Year Long Pants Sewalong thread, Barb has suggested scooping the back crotch. Since the crotch fit is SO comfy I was extremely reluctant to change it in ANY way !

I'd also been asked what happens if I stand with a wider stance. What happens ? The wrinkles go away - well, at least some of them do.

More research needed as this is twigging a thought in the old brain - it ain't what it used to be LOL. OK, somewhere in all the pants research last year I stumbled across a site/article/something that talked about legs needing to be centered in the 'tube' that is the pant leg - the analogy was pipes and tubes. I found it again the other day, forgot to bookmark it and promptly forgot how and where I found it - sorry. The light bulb in the brain was getting a bit brighter - I kept digging.

In the meantime, I decided it 'wouldn't hurt' to just baste the darn crotch a bit lower and see what happens. I lowered the back crotch and also lowered the waistband at CB.

Ick ! The age-old problem of fix one thing, affect another.
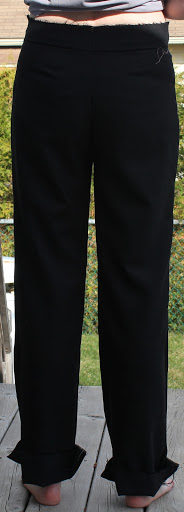
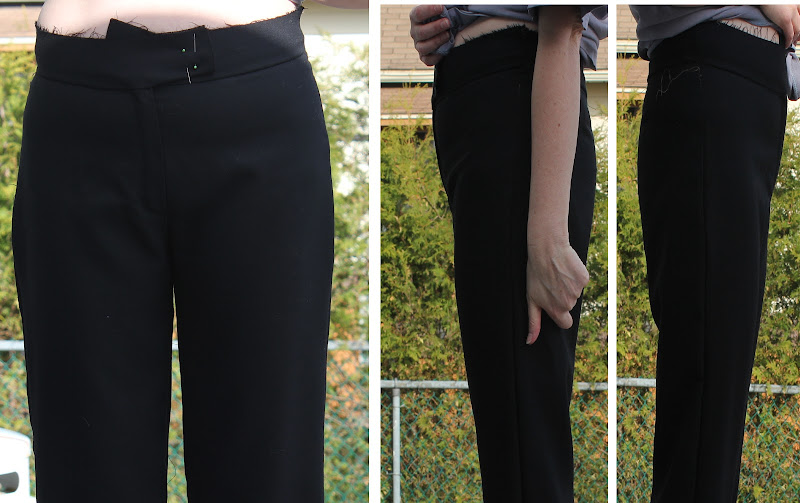
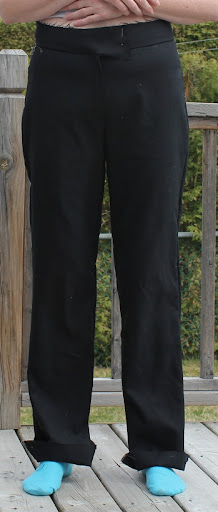
The front now has a camel - toe that wasn't there before - straight out of the envelope I felt the front was 'good to go' - looked and felt good. Now (sorry, blurry pic)…

Same problem on the sides - right leg twisty, left leg fine - this could be a grain line issue as I did not cut each piece separately. It's possible the underside could have been not quite straight. I had every intention of marking the grain lines but forgot til after DH took the pics and I was back in comfy yoga pants (darn memory !)


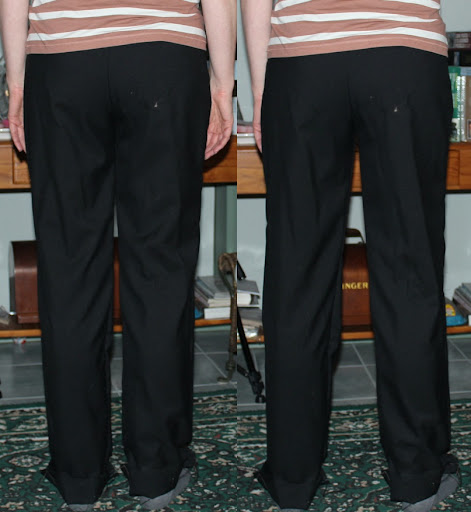
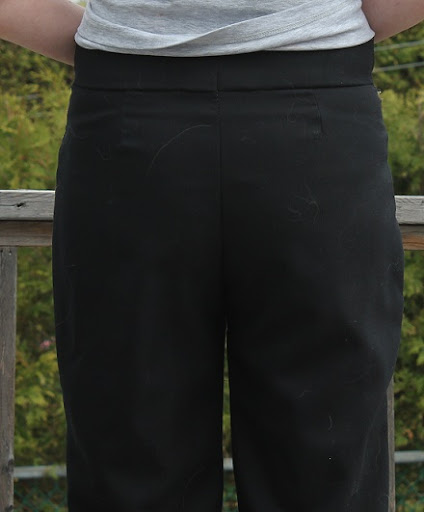
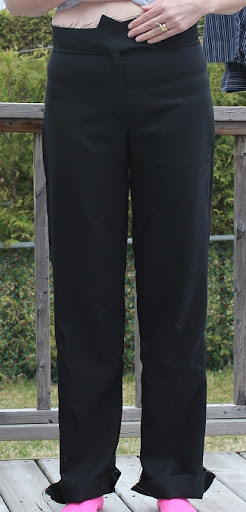
…and the back - from left to right… as is / with the CB tugged up a bit / and with CB tugged up a bit more.

I also made sure to stand in a comfortable width stance. Note I have NOT clipped the crotch seam at all - there's between 5/8" and 3/4" SAs in there. Yeah, yeah, I know it's not an accurate pic with all that fabric in the SAs, but remember I was just 'basting'.
Aha ! Belinda had a bunch of pants fitting posts. This one is the first in a series of 3 
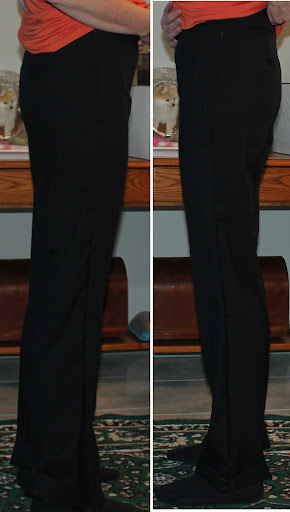
Sew4Fun - fitting 1. I linked this same post last Saturday but this week have read more closely through all her pants posts and I'm almost positive I need to shift these legs toward the inseam. I paid close attention during the last fitting and I can feel my legs touching the inseam - all the empty space seems to be a the side seam. My legs are not centered in these pipes LOL
Now ? I posted these pic in the Sewalong thread on PR and will see if there are any comments tonight, but
  • I'm going to trash this pair instead of finishing them 'just because' - I'm only playing with $5 worth of fabric here and that 5 bucks has already provided me with 2 weeks of entertainment. Plenty enough bang for the buck without stressing over having to end up with a finished garment.
  • So far, I've cut an 8 inseam, 10 side seam, let out and lowered the side seams 1/4", lowered back crotch curve 1/4" and lowered CB 1/2".
Before I play with the pattern and cut a new muslin, I'll clip the crotch curve and take another pic.

Monday, April 9, 2012

Only a small difference

Only made one change - unpick the waistband from the pants and rebaste it lowering the side seams. It only gave me about 1/4" so I wasn't expecting a great improvement, if any.

Some of the comments I received were from:
Digs - drop the side seams & widen a smidge
...I had already widened approx a 1/4" smidge from waist to a few inches below the crotch. The change was the 1/4" drop of side seams
Waikikimum - extended calves & maybe back thigh length too long ?
...I definitely have hyperextended calves ! The back thigh length may be too long. I could pin a wedge here, but I'll only be able to fix it in the next version.
Gwensews - check out Peggy Sagers videos for wrinkle help.
...Gwen, I've watched one of Peggy's pants videos - one where she fit pants onto 2 women. It was a while ago though, I should go back and rewatch it and check out the jeans fitting one as well.

In the meantime, here are the next round of pics.
Front and back - all I've done since last time is rebaste the waistband and lower the side seams that 1/4". The front shows the hip curve REALLY needs to be adjusted - they look like jodphurs now :-)

Since I could only resew such a tiny amount, I tugged the side seams down another bit - maybe about 1". You can see the waistband is now looking straight across rather than contoured. The wrinkles are a bit less pronounced on the right but I have no idea why. Maybe my stance was different.


Next up - the dreaded wedgie shot - the wrinkles changed but I have NO IDEA what this is telling me !

Last one - knowing I have hyperextended calves, I bent my knees a bit to see if this would help the drape of the back below the knees - I don't see much difference.

I don't think there is anything else I can do with this pair. I think I'll sew them up for real and see what I end up with. A lining would probably help the drape but I haven't done a pant lining yet - should I start now ?

For the next version, two wedges (Debbie's X-wrinkles) may help - these would both add to the side seams and take some length from the back inseam.

Any other suggestions ?

Saturday, April 7, 2012

Saturday Post #2 - A Little Less Phooey

Making progress. Thanks for all the comments/advice so far.

I figured the best place to start was to loosen up those waist/hip side seams. I let them out 1/4" which gave me 1" more room.

Front - the wrinkles on either side of the bottom of the zip changed some - not sure if I need to deal with these or are they normal ?

Left/Right sides - left side seam goes pretty much straight down center of leg - right side seam moves forward (last year my legs were twisting forward and Sew-4-Fun (link goes directly to her pants fitting post) suggested to shift the legs - is it possible to need to shift the leg of only ONE leg ?)

Back - diagonal wrinkles are still there, not helped at all by the extra bit of ease. Need to lower the side seams a bit but I only have the waistband attached with a 5/8" seam so not much to play with. Question - if this works, do I make this adjustment to the pattern by adding a horizontal wedge at or above the hip line ? Where exactly ? or do I just add it to the top at the waist edge ?

Back close-up - still lots of wrinkles but for some reason they don't looks as discouraging as they used to. Maybe because I see all diagonal lines, rather than the mess of horizontal, diagonal and vertical that existed in the pants last year. I look at this and really think an addition to the side seams should/could fix them.

Any more thoughts - am I way off base ?


Pants - Phooey

Can I start by stating that I really don't WANT to post these ? Yeah, I'm going to anyway. What follows is the result of making a muslin in a stretchy fabric, GUESSING the necessary changes for a non-stretchy final fabric and sewing with fingers crossed. Take it from me - DON'T DO IT ! :-)

Yesterday I jury-rigged an underflap for the fly. No idea if I did it 'right' but at least there is one installed now.
I also got the waistband pieces cut out and interfaced.

This morning, I decided the goal would be to get everything basted so DH could get a couple of daylight pics.
Instead of working hidden down in the basement, I pulled out one of my Singer 99s and set it up in the sunroom. Got some practice in on threading, winding a bobbin and adjusting both tension and stitch length. Hubby thought to snap pics while I wasn't paying attention...

...and the pants. First up, the back, I'm still pretty ok with the crotch seam. I used the 1" Center Back seam as given on the pattern. This seemed to work to my body shape. There was also a 1" SA at the top of the back inseam - I think that one's ok too. BUT, the side seams had a 1" safety net and I only sewed them at a 5/8" SA. As you can see, they're too tight from the hips all the way up to the waist. There are diagonal wrinkles on both sides but worse on the left (high hip ?). I'm going to start with letting out the sideseams to see if any of the wrinkles drop out and go from there.

Next two - the sideseams. Pros - Seams are straight. Cons - too tight and you can see the back diagonal wrinkles.

...and the front. Pros - no vertical wrinkles/folds at the top of the front inseam, no camel toe. Cons - too tight.

All in all - I believe these were a much better starting point than the Burda, or even the Ottobre (capris made a couple years ago - mucho wrinkles !). Sure there are things to fix but maybe not so much once I loosen up those seams.

Maybe a better fitting pic tomorrow...

Friday, April 6, 2012

Pants - Again

I finally managed to get down to the sewing room to work on a project. After all the work I put in last spring fitting pants, nothing fits anymore and I have to start from scratch. The Burda and HP Patterns that I was working on needed a fair bit of tweaking to fit my backside so I decided to try another company and see where I stand. The fact that I was trying to make trouser-type patterns fit more like jeans was probably not helping.

I recently posted a bunch of Simplicity patterns I'd picked up on a $1 sale. S2860 was the pattern I decided to use for slacks. For jeans, I checked around PatternReview, decided on V8774 and luckily enough Vogues were on sales the week after Simplicity so I grabbed one.

Most important right now to have some pants for work - we're not 'technically' allowed to wear jeans every day as I'm doing now. The Vogue jeans will be my next pants project though, I think. I would LOVE to have jeans that start and STAY long enough !

As you know, the Amazing Fit patterns have the Slim/Average/Curvy fit and detailed instructions on how to choose your size. So far, most reviews of these patterns that I've read say that picking the size and style with these instructions worked well. Yeah, not for me. My measurements put me in a size 14 average - and that's just gonna be TOO big. My fabric was the last of the grey 'RPL?' I was using last year and is pretty stretchy. I cut the size 8 slim and crossed my fingers. No pics, but after basting everything together, it seems as though the size 8 is the correct crotch shape for me. I sewed the back inseam on the 1" seam line and the sideseams at 5/8" (completely forgetting there were 1" SA's allowed).

There didn't look to be any wonky folds at the front crotch either horizontal below the zipper or vertical at the inner thigh. The back didn't seem to be too bad either. All good to go - I could have sewn these up as a final wearable muslin IF I HADN'T sliced into the back leg halfway between the knee and hem - duh !!! What to do ?

Well, find some other fabric and sew up a real pair - crossed fingers, of course LOL

In Aug 2009, Fabricville had a sale on 4-season wools - I bought 2 pieces - blogged HERE. Even though they were only $2.99/m, my brain got stuck on 'good fabric'. Besides, sitting in the collection for 2-1/2 years wasn't doing my wardrobe any good ! Brain is now unstuck and a pair of wool pants is cut out from the black on black pinstripe. Given the muslin was stretchy and the good pair is wool, I cut the crotch seam and inseam at size 8 and the sideseams at size 10 'just in case'.

All that's done so far is the zipper. I added a cut-on fly extension and used Sandra Betzina's instruction (link on the sidebar) to insert the zipper. A 3-day weekend now so the big plan is to work on these pants and maybe finish them. Optimistic? Probably but I'll give it a shot !

Have to have a picture - here's the zip so far. Not completely unhappy with it but forgot the underlap - duh !